Tuesday, May 13, 2025
Mac binding in VPN
hsdc_primary # config vpn ssl web portal
hsdc_primary (portal) # edit ssl_vpn
hsdc_primary (ssl_vpn) # config mac-addr-check-rule
hsdc_primary (mac-addr-check-rule) # edit mac_allow_rule
hsdc_primary (mac_allow_rule) # append mac-addr-list
hsdc_primary # config vpn ssl web portal
hsdc_primary (portal) # edit ssl_vpn
hsdc_primary (ssl_vpn) # config mac-addr-check-rule
hsdc_primary (mac-addr-check-rule) # edit mac_allow_rule
hsdc_primary (mac_allow_rule) # append mac-addr-list
hsdc_primary (mac_allow_rule) # end
hsdc_primary (ssl_vpn) # end
Tuesday, June 16, 2020
Reset Windwos 10 Password
1.Insert Windows 10 in Cd Rom2. Press Shift 103.Enter command diskpart4. List Volme 5.Exit6. cd c:7. c:cd windows 8.c:/windows/ cd system329. c:/windows/sytem32/copy utilman.exe utilman1.exe10 c:/windows/sytem32/copy cmd.exe cmd1.exe11. c:/windows/sytem32/del utilman.exe12 c:/windows/sytem32/rename cmd.exe utilman.exe13 Exit from cmd promt 14 .Restart PC 15.Click on utilty cmd.exe16.type command control userpasswords2 17 Reset Password 18 Add User19 Enter New Password
Wednesday, December 25, 2019
Set clock on Cisco Switch
Command to set clock On cisco switch
clock set [hh:mm:ss] [month] [day] [year] clock
clock set [hh:mm:ss] [month] [day] [year] clock
Tuesday, June 26, 2018
Thursday, July 14, 2016
Control bandwidth on cisco router
Router(config)# policy-map WIFI
Router(config-pmap)# class class-default
Router(config-pmap-c)# police cir 15360000 15360000 is the Bandwidth Rate = 15 * 1024 * 1000
Router(config-pmap-c-police)#conform-action transmit
Router(config-pmap-c-police)#exceed-action drop
Router(config-pmap-c-police)# end
Router#
Second Step: apply the Policy on the Interface
Router#conf t
Router#int fa 0/1.1
Router(config-subif)# service-police input WIFI
Router(config-subif)# service-police output WIFI
Friday, October 30, 2015
Password recovery for Cisco 1800 router
To recover your password, follow these steps:
1. Attach a terminal or PC with terminal emulation to the console port of the router. Use these terminal settings:
9600 baud rate
No parity
8 data bits
1 stop bit
No flow control
2. Use the power switch to turn off the router, and then turn it back on.
3. Press Break on the terminal keyboard within 60 seconds of the power-up to put the router into ROMMON.
4. Type confreg 0x2142 at the rommon 1> prompt to boot from Flash without loading the configuration.
5. Type reset at the rommon 2> prompt.
6. The router reboots, but ignores its saved configuration.
7. Type no after each setup question, or press Ctrl-C to skip the initial setup procedure.
8. Type enable at the Router> prompt.
9. You are taken to the enable mode, and the Router# prompt appears. Important: Type configure memory or copy startup-config running-config to copy the nonvolatile RAM (NVRAM) into memory."Do not type configure terminal."
10. Type write terminal or show running-config .
11. The show running-config and write terminal commands show the configuration of the router. In this configuration you see under all the interfaces the shutdown command, which means all interfaces are currently shutdown.
Also, you can see the passwords (enable password, enable secret, vty, console passwords, and so on), either in encrypted or unencrypted format.
The unencrypted passwords can be re-used, the encrypted ones will have to be changed with new passwords.
12. Type configure terminal and make the changes.
13. The prompt is now hostname(config)#.For example, type enable secretto change the enable secret password.
14. Issue the no shutdown command on every interface that is used.
show ip interface brief
configure terminal
interface FastEthernet0/0
no shutdown(repeat for other interface cards)
15. copy running-config startup-config16. config-register 0x2102
show version
Go to the bottom of the output
Configuration register is 0x2142 (will be 0x2102 at next reload)
17. Restart the router
Tips:To change the password use the following commands
For console
line console 0
login (Tells the IOS that a password prompt is desired at the consolepassword love)
For auxially port
line aux 0
loginpassword love
For Telnetline
vty 0 4
login
password love
1. Attach a terminal or PC with terminal emulation to the console port of the router. Use these terminal settings:
9600 baud rate
No parity
8 data bits
1 stop bit
No flow control
2. Use the power switch to turn off the router, and then turn it back on.
3. Press Break on the terminal keyboard within 60 seconds of the power-up to put the router into ROMMON.
4. Type confreg 0x2142 at the rommon 1> prompt to boot from Flash without loading the configuration.
5. Type reset at the rommon 2> prompt.
6. The router reboots, but ignores its saved configuration.
7. Type no after each setup question, or press Ctrl-C to skip the initial setup procedure.
8. Type enable at the Router> prompt.
9. You are taken to the enable mode, and the Router# prompt appears. Important: Type configure memory or copy startup-config running-config to copy the nonvolatile RAM (NVRAM) into memory."Do not type configure terminal."
10. Type write terminal or show running-config .
11. The show running-config and write terminal commands show the configuration of the router. In this configuration you see under all the interfaces the shutdown command, which means all interfaces are currently shutdown.
Also, you can see the passwords (enable password, enable secret, vty, console passwords, and so on), either in encrypted or unencrypted format.
The unencrypted passwords can be re-used, the encrypted ones will have to be changed with new passwords.
12. Type configure terminal and make the changes.
13. The prompt is now hostname(config)#.For example, type enable secret
14. Issue the no shutdown command on every interface that is used.
show ip interface brief
configure terminal
interface FastEthernet0/0
no shutdown(repeat for other interface cards)
15. copy running-config startup-config16. config-register 0x2102
show version
Go to the bottom of the output
Configuration register is 0x2142 (will be 0x2102 at next reload)
17. Restart the router
Tips:To change the password use the following commands
For console
line console 0
login (Tells the IOS that a password prompt is desired at the consolepassword love)
For auxially port
line aux 0
loginpassword love
For Telnetline
vty 0 4
login
password love
Thursday, October 22, 2015
Block mac address In Network
MAC Address-Based Traffic Blocking
On Router
Router(config)# mac address-table static 0050.3e8d.6400 vlan 12 drop
On Cisco Switch
Switch(conf)#mac address-table static 3408.0499.981c vlan X drop
Thursday, October 1, 2015
Window Firewall command
wf.msc
To start Firewall
To start Firewall
- NetSh Advfirewall set allprofiles state on
- NetSh Advfirewall set allprofiles state off
Thursday, August 6, 2015
hOW TO TAKE DHCP SCOPE BACKUP
command for taking backups
netsh dhcp server export C:\dhcp.txt all
netsh dhcp server import C:\dhcp.txt all
Exports and Imports ALL Scopes. You can export a single scope by replacing the ALL keyword with the name of the scope, like
netsh dhcp server import C:\dhcp.txt 10.10.10.0
Thursday, June 11, 2015
Monday, May 11, 2015
Problem In Network
Application does not work since lInk is up and working fine
only data through http port is not send and recieve
Solution Increase MTU Size on Router Interface

only data through http port is not send and recieve
Solution Increase MTU Size on Router Interface

Sunday, September 7, 2014
Disable boot p server and proxy arp server
Command to disable bootp server on cisco router
no ip bootp server
Disable proxy arp Service
R1> config t
R1#interface fa0/1
R1(config)#no ip proxy-arp
SSH CONFIGURATION ON CISCO DEVICES
ip domain-name CISCO.com
crypto key generate rsa modulus 2048
ip ssh time-out 60
ip ssh authentication-retries 3
ip ssh version 2
ip ssh source-interface GigabitEthernet 0/1
line vty 0 4
transport input ssh
crypto key generate rsa modulus 2048
ip ssh time-out 60
ip ssh authentication-retries 3
ip ssh version 2
ip ssh source-interface GigabitEthernet 0/1
line vty 0 4
transport input ssh
Friday, September 5, 2014
Configuration of switchport port-security
SW1>enable
SW1#configure
terminal
Enter
configuration commands, one per line.
End with CNTL/Z.
SW1(config)#interface
fa0/1
SW1(config-if)#switchport
port-security
SW1(config-if)#switchport
port-security mac sticky
SW1(config-if)#switchport
port-security violation protect
SW1(config-if)#end
To verify
your configuration you can use the following commands shown below;
SW1#show
port-security interface fa0/1
Port
Security : Enabled
Port
Status : Secure-up
Violation
Mode : Restrict
Aging
Time : 0 mins
Aging
Type : Absolute
SecureStatic
Address Aging : Disabled
Maximum MAC
Addresses : 1
Total MAC
Addresses : 1
Configured
MAC Addresses : 0
Sticky MAC
Addresses : 1
Last Source
Address:Vlan : 000f.242e.bf80:1
Security
Violation Count : 0
SW1#show
port-security interface fa0/1 address
Secure Mac Address Table
------------------------------------------------------------------------
Vlan Mac Address Type Ports Remaining Age
1
000f.242e.bf80
SecureSticky
Fa0/1 -
------------------------------------------------------------------------
Total
Addresses: 1
SW1#show run
int fa0/1
Building
configuration...
Current
configuration : 245 bytes
interface
FastEthernet0/1
switchport mode access
switchport port-security
switchport port-security violation restrict
switchport port-security mac-address sticky
switchport port-security mac-address sticky
000f.242e.bf80 vlan access
end
SW1#
Tuesday, August 28, 2012
DMZ(Demilitarized zone)
A DMZ (demilitarized zone) is a small network which lies between a company's private network and the
outside public network. It prevents outside users from getting direct access to
a server that has company data. A DMZ is more secure approach to a firewall and
effectively acts as a proxy server as well.
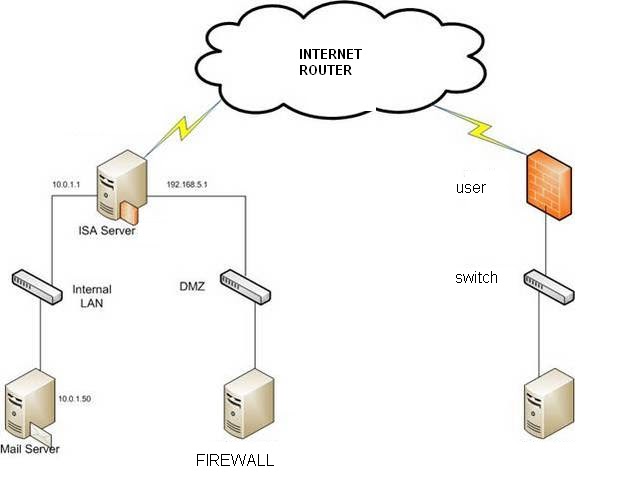
In a DMZ configuration for
a company, a separate computer receives requests from users within the private
network for access to Web sites or other companies portal companies accessible
on the public network. The DMZ host then initiates sessions for these requests
on the public network. However, the DMZ host is not able to initiate a session
back into the private network. It can only forward packets that have already
been requested.
Users of the public network outside the company can access only
the DMZ host. The DMZ may typically also have the company's Web pages so these
could be served to the outside world. However, the DMZ provides access to no
other company data
Wednesday, June 15, 2011
How to Recover a Lost Password on a Cisco Switch
To recover a password on a Cisco switch, you will have to be connected to the console port of the Cisco switch using 9600 baud, 8 bits, no parity, 1 stop bit, and xon/xoff flow control. I recommend using Hyperterminal that comes with Windows XP to do this (Read How to Use HyperTerminal with Cisco Routers & Switches for more info).
Once you are connected and see something on the terminal window when you press enter, unplug the power cable. Next, hold down the mode button on the front, as seen in the photo below, and connect the power cable.
On a 2900, 3500XL or 3550 (like the one shown) release the mode button after the 1x port LED goes out. On a 2940 or 2950 switch release the mode button after the stat light goes out. On a 2955, press the break key (ctrl-break on Windows) when you see the message that the switch will autoboot.
You should now see something like this (taken from a 3550 switch):
Notice that it says that the password-recovery mechanism is enabled.
At the switch: prompt, type flash_init and press enter. You should see something like this (at least on a 3550):
Now type load_helper and press enter. You should see something like this:
Now type dir flash: and press enter. You should see something like this:
The config.text file is what stores the administrative password that is keeping you from logging into the router. To get rid of this file, use this command:
rename flash:config.text flash:config.backup
Next, boot the switch using the boot command, like this:
Once the system is booted, you will be asked if you want to enter the initial configuration dialog. Say no and press enter.
Next, enter enable mode with the en or enable command. Then, type the following commands:
rename flash:config.backup config.text
copy flash:config.text system:running-config
After each command, you will be prompted to confirm the name of the destination file. Do this by pressing enter each time.
Go into global configuration mode by typing config terminal. Next type no enable secret.
Now you can reset your enable password to whatever password you want. In the example below, we used the enable password NetInsider to set the password to NetInsider.
Exit out of global configuration using the exit command and save your configuration with the copy running-config startup-config command. You will be prompted to confirm the name of the destination file. Press enter.
You have successfully reconfigured your switch’s enable password using the password recovery procedure. Even better, you were able to do this while preserving the entire switch configuration.
Tuesday, May 3, 2011
What Is IP Routing?
IP Routing is an umbrella term for the set of protocols that determine the path that data follows in order to travel across multiple networks from its source to its destination. Data is routed from its source to its destination through a series of routers, and across multiple networks. The IP Routing protocols enable routers to build up a forwarding table that correlates final destinations with next hop addresses.
These protocols include:
* BGP (Border Gateway Protocol)
* IS-IS (Intermediate System - Intermediate System)
* OSPF (Open Shortest Path First)
* RIP (Routing Information Protocol)
When an IP packet is to be forwarded, a router uses its forwarding table to determine the next hop for the packet's destination (based on the destination IP address in the IP packet header), and forwards the packet appropriately. The next router then repeats this process using its own forwarding table, and so on until the packet reaches its destination. At each stage, the IP address in the packet header is sufficient information to determine the next hop; no additional protocol headers are required.
The Internet, for the purpose of routing, is divided into Autonomous Systems (ASs). An AS is a group of routers that are under the control of a single administration and exchange routing information using a common routing protocol. For example, a corporate intranet or an ISP network can usually be regarded as an individual AS. The Internet can be visualized as a partial mesh of ASs. An AS can be classified as one of the following three types.
* A Stub AS has a single connection to one other AS. Any data sent to, or received from, a destination outside the AS must travel over that connection. A small campus network is an example of a stub AS.
* A Transit AS has multiple connections to one or more ASs, which permits data that is not destined for a node within that AS to travel through it. An ISP network is an example of a transit AS.
* A Multihomed AS also has multiple connections to one or more ASs, but it does not permit data received over one of these connections to be forwarded out of the AS again. In other words, it does not provide a transit service to other ASs. A Multihomed AS is similar to a Stub AS, except that the ingress and egress points for data traveling to or from the AS can be chosen from one of a number of connections, depending on which connection offers the shortest route to the eventual destination. A large enterprise network would normally be a multihomed AS.
An Interior Gateway Protocol (IGP) calculates routes within a single AS. The IGP enables nodes on different networks within an AS to send data to one another. The IGP also enables data to be forwarded across an AS from ingress to egress, when the AS is providing transit services.
Routes are distributed between ASs by an Exterior Gateway Protocol (EGP). The EGP enables routers within an AS to choose the best point of egress from the AS for the data they are trying to route.
The EGP and the IGPs running within each AS cooperate to route data across the Internet. The EGP determines the ASs that data must cross in order to reach its destination, and the IGP determines the path within each AS that data must follow to get from the point of ingress (or the point of origin) to the point of egress (or the final destination).
The diagram below illustrates the different types of AS in a network. OSPF, IS-IS and RIP are IGPs used within the individual ASs; BGP is the EGP used between ASs.
LDP IN MPLS
The Label Distribution Protocol (LDP) is used to establish MPLS transport LSPs when traffic engineering is not required. It establishes LSPs that follow the existing IP routing table, and is particularly well suited for establishing a full mesh of LSPs between all of the routers on the network.
LDP can operate in many modes to suit different requirements; however the most common usage is unsolicited mode, which sets up a full mesh of tunnels between routers.
* In solicited mode, the ingress router sends an LDP label request to the next hop router, as determined from its IP routing table. This request is forwarded on through the network hop-by-hop by each router. Once the request reaches the egress router, a return message is generated. This message confirms the LSP and tells each router the label mapping to use on each link for that LSP.
* In unsolicited mode, the egress routers broadcast label mappings for each external link to all of their neighbors. These broadcasts are fanned across every link through the network until they reach the ingress routers. Across each hop, they inform the upstream router of the label mapping to use for each external link, and by flooding the network they establish LSPs between all of the external links.
The main advantage of LDP over RSVP is the ease of setting up a full mesh of tunnels using unsolicited mode, so it is most often used in this mode to set up the underlying mesh of tunnels needed by Layer 2 and Layer 3 VPNs.
Wednesday, April 13, 2011
assign ip to the l3 switch ethernet port
l3>en
l3#config t
l3#int Gi0/0/20
l3#no switchport
l3#ip address 10.10.10.5 255.255.255.252
l3#
ip is assigned to the port of the l3 switch
l3#config t
l3#int Gi0/0/20
l3#no switchport
l3#ip address 10.10.10.5 255.255.255.252
l3#
ip is assigned to the port of the l3 switch
Subscribe to:
Posts (Atom)